Showing posts with label Computer Program. Show all posts

IQ DSN Team Report


Recently our team will advertise the public any products of power sockets to our customers through Facebook page official where startup our store on Marketplace too.

(DSN: https://web.facebook.com/DSNOfficials) And there are some of productions as such a power strip or power sockets. A lot of customers have used our products and become a popular of the accessory to the smart phone and the computers. In the present, there are three models for our customers as such model T09, model T08 and model T12. They all are good the products. Some models must be made the warranty for one month.

Here is it:

Show you model T09 that got a lot favorite from our customers

Tips of feature model T09

-          USB six ports 3.1A

-          Three sockets

-          Maximum voltage: 3000W MAX 250V*16A

-          Length: 2m

-          Child protection Door

-          Switch button

-          Heat shield

DSN team have tested on T09 already for using your daily with the model. We could use long time with this model. And also, we could test any models that got a good result on all of them. The key of our product has made the focus on the quality of product. They have got many certificates that have made the verify about good materials in China. And we have done the feedback from our customers. The customers said that it has easy using with their accessory more as smart phone tablet or computers and other accessories. This is one point that have showed our product to get many popular from my customers. DSN Team keep go on working the research more to find good products for our customers.

We hope that  all everyone always use our products, we will got some the feedback from any time of our customers.

YouTube Watch:

How To Connect Arduino UNO With Module Measure Sensor.


Today, technology is playing an important role in this period. And there are a lot of electronic devices that are coded into a chip, just like the Arduino. Coding We have the basics of C and C ++ coding languages. To develop into the whole article, we should understand and explain more about Arduino UNO devices. The Arduino UNO is an electronic device that can run your coding. And more importantly, the system works well to your needs, depending on the coding commands. As for the other device you saw above. It is a power monitoring device. It is used to measure electrical energy. To bring the device, you can connect to it and write the code to the Arduino UNO for your settings. In the above project, we have demonstrated how to connect an Arduino UNO device with a power monitor. Therefore, measuring electricity is a very important part of making electricity.

According to the above interpretation. We can understand how to connect it with the chart that our writing above. We used Arduino UNO coding software. Arduino UNO coding software is a program to express the concept of C or C ++ coding language.

Below this Advantage and disadvantage
Advantage of using voltage such as
- Control Power of solar system

- Control Power of battery
- Checking electronic power

Disadvantage of using voltage sensor
  -
Perishable equipment
  - Limited power control
  - Difficult and connected with high power
You can know detail of the devices

 And under there are some devices as Arduino UNO and Module Measure Sensor. Finally, in this article, we want you to explore new technologies and develop electronic control devices such as power monitors or Arduino UNO and Module Measure Sensor. Here is our video. Please check our video.

And you can download our code through link below:

Google drive: Download

Make Server with Client on ESP8266

 For this project we will show you how to make one server on ESP8266. We can send data to our server. And the host is a server that we store to manage the data of the automation device.

This is our thumbnail of YouTube


Google drive : https://drive.google.com/drive/folders/1e9sEVGok1oDiQZ9EWVKh08sdP5Ue9G-2?usp=sharing

How to make Clien to communicate with Server

 For this project, we will show you how to create the client with ESP8266 Wi-Fi .

This is our drawing on this project.


Google Drive  : https://drive.google.com/drive/folders/1Auys_ydao7SLs07uzcGYxWdypY-WzJlH?usp=sharing

YouTube :


How to make Traffic Light on Proteus

 Today I will show you how to make traffic light on Proteus with Arduino Software . You can watch my video on the below .So You can learn  with me how to make the Traffic Light as the below. I have done  uploading my code on the below. obviously, you have one program to write your code and connect your component as such Proteus (ISIS)  and Arduino Software.

This is how to connect .

Google Drive :https://drive.google.com/drive/folders/1FKHVjKYL4tvc-AxyRDOJIRknCG3twVmO?usp=sharing

Full video on YouTube:

How To Make Traffic Lights

Today, technology plays an important role in helping humanity. And it made rules for us. Because of this, people began to create devices that were easy to hold. Accordingly, we would like to suggest how to make traffic lights through Arduino and LED devices. To understand the meaning in depth, we will explain and explain the above two types of tools. The first type of Arduino device is an electronic device that can process your code. It can store data and operations at your command.

For many projects, they are installed and used in all fields. The second type is LED lighting. They are electronic devices that can emit light to illuminate humanity. LED light bulbs can store electricity according to their device level. LED bulbs are commonly used in conjunction with other electronic devices to act as a signal.

According to the above explanation, we show how to make the following traffic lights.

1. Arduino device

2. LED lighting equipment

3. Electrical transmission

4. Board

5. Computer for coding

For this project, you can take a look at our video on YouTube. In addition, the traffic lights also have advantages and disadvantages for people.

I. Advantages

- Reduce traffic accidents

- Make people have good habits

Make the city and the countryside beautiful by lighting the lights at night.

II. Disadvantages

- Electricity consumption

- Create heat in rural and urban areas

- Slightly harmful to health


This is the drawing on Arduino 

D1 > pin Red LED

D2 > pin Green LED

D3 > pin Blue LED

 pin G Arduino > pin Ground

Google Drive: https://drive.google.com/drive/folders/1QeNa6Et43H0m2cjAiEBCoanOlgoGrO49?usp=sharing

Full YouTube:

Mask Detection with Adruino ESP8266 Wi-Fi

Today I will show you about making the Mask Detection with Arduino ESP8266. And I use the Python language and OpenCV Library on Python.  So you can do it by watching of my video. In this video I just explain about the system working on my project .  And I hope that you will be able to do it .

Here is one Demo on my computer about the Mask Detection .

This is drawing a simple on Arduino 

Google Driver :https://drive.google.com/drive/folders/1xcVb2GlgVb5TalVzOgMG13HmVA6lExF_?usp=sharing

Full video on YouTube: 

Auto Dark Activate Light on Proteus and Arduino Simulation

 Today I will show you about making Auto Dark Activate Light  on Proteus and Arduino Simulation. This is a simple for you learning Arduino  and you can make the simulation on Proteus

This is the drawing on Proteus:

The material of this project

- LDR

- Arduino Uno

- DC 5V for LDR

- LED Red

- Resistor 1K and 220ohm

Google drive:https://drive.google.com/drive/folders/1fCmg7jnBatUCXsHZPienA6kFC1tUuwdz?usp=sharing
 Full video on YouTube:

How to use IR Infrared Obstacle Avoidance Sensor Module with Servo on Proteus and Arduino

 Today I will show you how to use IR Infrared Obstacle Sensor with Servo to control thing that you need it. So this is one project that can use to prevent covid-19. Please try to do it and it can help you if you do not touch your hand with something.


Google Drive :https://drive.google.com/drive/folders/1hTPNjYYEpyYLaY4vc6rqPQuuZ33bO5Lr?usp=sharing

Full video on YouTube :

How to use Servo on Proteus with Arduino Software.

Today I will show you Servo connection with Proteus & Arduino Software. If you like the video, please click Subscribe to get the latest videos. We can do the demo on Proteus with Arduino software. And it is a simple for turning on Servo on Proteus with Arduino. I think that  it is a good simple for the beginners to learn with Arduino and Proteus.


Material of Project :

- Proteus 

- Servo

- Battery 5V

- Arduino software

Google drive :https://drive.google.com/drive/folders/1B1-sDCaSuW0bqy5YbLPHy7ybNWozxTG1?usp=sharing

Full video on YouTube

How to install Arduino software on Windows in 2021

Today , I would like to show  how to install Arduino software on Windows. And it is one program for us to learn Arduino. I hope that you can do it as such me. So this is the material of Arduino. You must be download Arduino software and attach file of the link of ESP8266. If you like the video, please click subscribe to receive new videos.Thank you very much for visiting.


Here is Google:https://drive.google.com/drive/folders/1usCbpDI7yq5uIJjs_TfFUCNKMipKVsCi?usp=sharing

This is a full video on YouTube

Basic of Arduino​ & Proteus

This is a foundation for those who do not have an Arduino device. And you can also learn with Proteus to learn how to connect Arduino and other devices. If you like the video, please click subscribe to receive new videos.Thank you very much for visiting.


Material of this video:

- Proteus 7 Professional

- Arduino Software

You have some knowledge of C language  or C++ language

Google Drive :https://drive.google.com/drive/folders/1cOMXZOjKgT7dct2ZdNK4XbSvAjgGnOC6?usp=sharing

Full video on  YouTube:

To work together to prevent covid-19 infections

To work together to prevent covid-19 infections, we need to keep a distance of 1.5m. Using the instrument of Ultrasonic Sensor to measure the cost of distance. If you like the video,click subscribe and share to your friends.


Material of this project

- Wemos D1 ESP8266

- Ultrasonic Module Sensor

- Buzzer

- LED (Red LED and Green LED)

- Resistors 10Kohm

 - Arduino Software

Here is my drawing


Google drive:https://drive.google.com/drive/folders/1YBcFZI1m9tKqqLoGk7TIxYOdpEBWFGFM?usp=sharing

Full video on YouTube:

How to use Temperature & Humidity with Web Server

For this project, I will explain you about some codes of DHT 11  Module Sensor.And it will check temperature and humidity that has been doing the monitor in our local network. If you like this video , please click Subscribe and share & like to your friends.


You can make to look at the monitor of temperature & humidity with web server. such as  the picture  below.

Here is the below , this is the drawing of the project.

For this project  has some materials like below

- Arduino ESP8266 Wi-Fi

- DHT 11 module sensor.

- Resistor 200ohm

- Battery 9v 

Google drive : https://drive.google.com/drive/folders/11S9havk2iVHZE3kWXI4uQtHbrYSS_zGj?usp=sharing

Full video on YouTube:

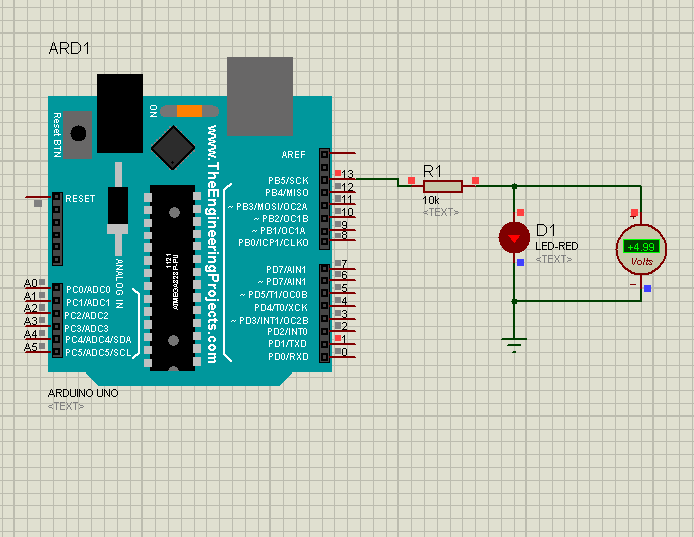
Basic of LED on Arduino UNO

 For this day, I will show you how to turn on  a PIN for this  Arduino UNO. I think that it is the beginner of learning Arduino UNO. And this below , I will show the Arduino UNO, Breadboard and  LEDs for you.


Material of this project :

- Arduino UNO 

- LEDs

- Resistor 1kohm

- Jumper Wires

- Arduino Software

This is the draw of the project. 

----

Here is a basic of my code: https://drive.google.com/drive/folders/16Ub7HhGcr7G0Bft33W0Oks3rTX-bPrC2?usp=sharing

Full video on YouTube.

Create one Web Server on Arduino ESP8266

 For this lesson, I will show you to create Web Server for ESP8266 Wi-Fi. This is a basic of creating one Web Server.I hope that you can do it for the web server .

Materail of this project:


Here are the WebServer source and Library 

-WebServer :https://github.com/acrobotic/Ai_Tips_ESP8266/blob/master/webserver_html/webserver_html.ino

-Library: https://github.com/esp8266/Arduino/blob/master/doc/filesystem.rst

 My Code  is in Google drive :  https://drive.google.com/drive/folders/1sboPh6SncwWAH5St-OxL8rUB2QmHrib5

Full video on YouTube

The Controller LED 220VAC With Relay Module & ESP8266 Wi-Fi

Nowadays, the use of lighting control systems is becoming more and more popular in humanity. However, the development of control systems has been adopted, such as Arduino and other electronic devices. To better understand this topic, let's take a look at some of the electronics, such as the ESP8266, the light bulb, and the Relay Module. What is the role of all of them? And how does it work? How has it helped humanity?

In fact, the ESP8266 is an electronic device that can store its code to generate code by coding it. But for this one, it has the function of Wi-Fi to connect to the Internet. And for the Relay Module, it is like a kind of electronic device whose role is to turn on and off the power source (called Relay, it is a technical term).

As for the light bulb, it is a kind of electronic device that can emit light.

For this project, it is a basic of making the controller of LED 220v with Relay Module and ESP8266 Wi-Fi. If you like this video, please click Subscribe and share to your friends.  

We can practise to make the control of LED 220VAC. It is the simple of project.

And the below this , there are some electronics . 


This is the drawing of the project.

Materail of this project:

- ESP8266 Wi-Fi

- Relay Module One Channel

- LED White Light 220VAC

- Jumper Wires

- Blynk App & Arduino Software

Google Driver:https://drive.google.com/drive/folders/1a1f2THy5S5JWC3CguJOWxxh7hS0ha0pS?usp=sharing

Full video on YouTube: